
 Light-Up Paper Circuits: A Simple STEAM Project Kids Love
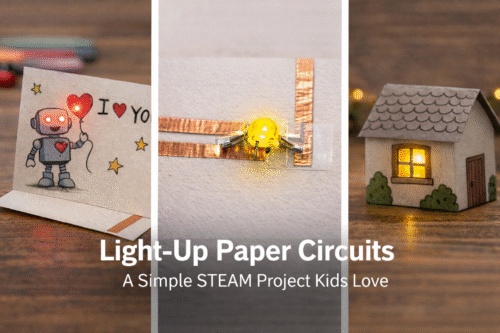
Paper circuits are a powerful way to introduce real engineering concepts using simple materials. With copper tape, a coin cell battery, and small LEDs, kids can create glowing artwork while learning how electricity flows.
This project blends creativity and problem-solving. Students design first, then build a working circuit underneath their artwork. When the light turns on, they see immediate proof that their design works.
Materials
- Copper tape (5mm works well)
- 3V coin cell battery (CR2032 recommended)
- LED light (any color)
- Cardstock or thick paper
- Clear tape
- Markers or decorative supplies
- Optional: aluminum foil (for a simple switch)
Before You Start: Understanding Polarity
LEDs only work in one direction.
- Long leg = Positive (+)
- Short leg = Negative (–)
The battery also has a positive (+) side marked on it.
For the light to turn on, positive must connect to positive and negative must connect to negative.
If connected incorrectly, simply flip the battery or adjust the LED.
Step-by-Step Instructions
1. Create the Battery Holder
- Fold one corner of your paper.
- Trace the coin battery on both sides of the fold.
- This fold will hold your battery in place.
2. Lay Down the Copper Tape
- Start one strip of copper tape at the traced battery circle.
- Run it across the paper toward where your LED will go.
- Add a second strip starting from the other side of the battery circle.
- Keep the two strips about ½ inch apart.
- The strips must not touch.
3. Attach the LED
- Place the LED so each leg rests on a different strip of copper tape.
- Ensure the long leg touches the strip connected to the battery’s positive side.
- Tape the LED legs securely so they stay in contact with the copper.
4. Insert the Battery
- Slide the battery into the folded corner.
- Close the flap so the copper tape touches both sides of the battery.
- Press gently.
If the LED does not light:
- Flip the battery.
- Check that the copper strips are not touching.
- Ensure the LED legs are taped firmly to the copper.
Optional: Add a Simple Switch
- Cut a small flap in your paper design (like a door).
- Add a small piece of aluminum foil under the flap.
- When the flap closes, the foil connects the copper strips and completes the circuit.
- When open, the circuit breaks and the light turns off.
What Kids Learn
- How electricity flows in a closed loop
- Polarity and directional current
- Circuit design and layout
- Troubleshooting and iteration
- Creative application of engineering principles
Paper circuits show that engineering does not require complicated equipment.
It begins with understanding how systems connect — and having the patience to test, adjust, and try again.